이번 android편은 크게 3Step으로 이루어져 있습니다.
STEP 1. 세팅하기
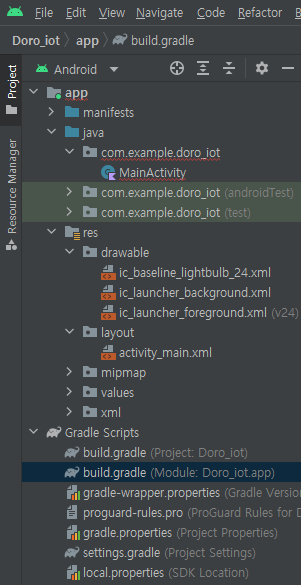
우선 view binding을 사용하기 위해 build.gradle module 수준에서 kotlinOption 하단에 작성한다.
뷰 바인딩(view binding)이란 레이아웃 XML 파일에 선언한 뷰 객체를 코드에서 쉽게 이용하는 방법으로 기존에 XML파일에 등록할 뷰를 이용하려면 findViewById().함수를 이용하여 호출해야 하는 번거로움을 해결하기 위해 사용하게 되었습니다.
    viewBinding{
        enabled = true
    }
이후 아두이노와 안드로이드의 통신과 버전을 적합하게 하기위해 dependencies의 내용을 모두 지우고 하단의 내용으로 수정한다.
    implementation 'androidx.core:core-ktx:1.8.0'
    implementation 'androidx.appcompat:appcompat:1.5.1'
    implementation 'com.google.android.material:material:1.8.0'
    implementation 'androidx.constraintlayout:constraintlayout:2.1.4'

    implementation 'com.squareup.retrofit2:converter-gson:2.9.0'
    implementation 'com.squareup.retrofit2:retrofit:2.9.0'
    implementation("androidx.swiperefreshlayout:swiperefreshlayout:1.1.0")

    implementation 'com.squareup.retrofit2:converter-scalars:2.9.0'

    testImplementation 'junit:junit:4.13.2'
    androidTestImplementation 'androidx.test.ext:junit:1.1.5'
    androidTestImplementation 'androidx.test.espresso:espresso-core:3.5.1'
그 다음 상단에 파란색 Sync Now 버튼을 눌러 적용

이번에는 AndroidManifest.xml 에 접근합니다.
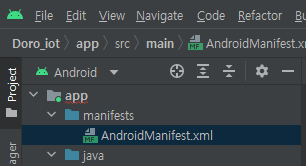
해당 파일 안에 2개의 코드를 추가합니다.
<uses-permission android:name="android.permission.INTERNET" />android:usesCleartextTraffic="true"해당 코드를 사용해야만 android 핸드폰에서 인터넷 통신을 이용한 서비스를 사용할 수 있습니다.
보안 및 다양안 이슈로 인해 막아 놓은 기능을 사용할 수 있게 만들어 줍니다.
추가한 사진입니다.

STEP 2. View 디자인하기
우선 이미지를 추가해봅시다.

res 폴더 하단의 drawable을 우클릭하여 new -> vector asset클릭 후
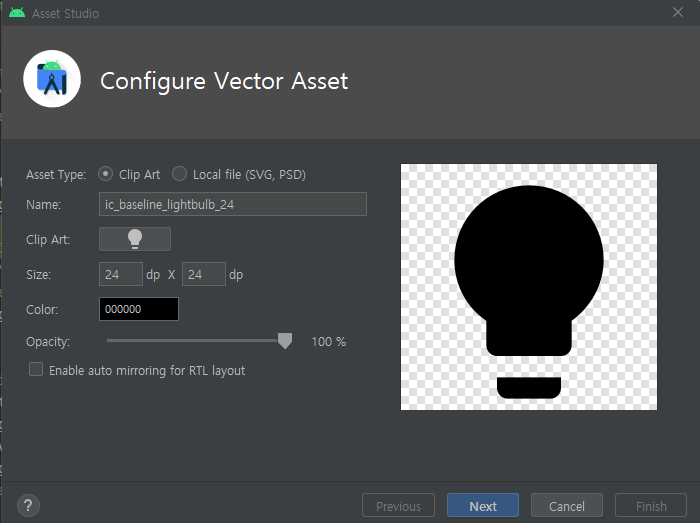
lightbulb 로 검색하여 나온 이미지를 ok 버튼을 누르고 next -> finish를 눌러주면 됩니다.
우선 전체 뷰 코드입니다.
<?xml version="1.0" encoding="utf-8"?>
<androidx.constraintlayout.widget.ConstraintLayout xmlns:android="http://schemas.android.com/apk/res/android"
    xmlns:app="http://schemas.android.com/apk/res-auto"
    xmlns:tools="http://schemas.android.com/tools"
    android:layout_width="match_parent"
    android:layout_height="match_parent"
    tools:context=".MainActivity">

    <LinearLayout
        android:layout_width="match_parent"
        android:layout_height="match_parent"
        android:orientation="vertical">

        <TextView
            android:layout_width="match_parent"
            android:layout_height="wrap_content"
            android:text="내방 전등 제어하기"
            android:textSize="30dp"
            android:textColor="@color/black"
            android:gravity="center"
            android:layout_marginTop="100dp" />

        <ImageView
            android:id="@+id/light_imge"
            android:layout_width="100dp"
            android:layout_height="100dp"
            android:layout_gravity="center"
            android:layout_marginTop="70dp"
            android:src="@drawable/ic_baseline_lightbulb_24"/>


        <LinearLayout
            android:layout_width="match_parent"
            android:layout_height="wrap_content"
            android:orientation="horizontal"
            android:layout_marginTop="70dp"
            android:gravity="center">

            <Button
                android:layout_width="wrap_content"
                android:layout_height="wrap_content"
                android:id="@+id/led_on"
                android:layout_margin="5dp"
                android:text="on" />

            <Button
                android:layout_width="wrap_content"
                android:layout_height="wrap_content"
                android:id="@+id/led_off"
                android:layout_margin="5dp"
                android:text="off" />

        </LinearLayout>

        <TextView
            android:layout_width="match_parent"
            android:layout_height="wrap_content"
            android:gravity="center"
            android:textSize="20dp"
            android:text="제작자 황준섭"
            android:layout_marginTop="70dp"/>


    </LinearLayout>

</androidx.constraintlayout.widget.ConstraintLayout>
이제부터 여기에 사용된 기술에 대하여 작성하겠습니다.
레이아웃 클래스란 화면을 독자적으로 출력하지 않고 다른 뷰 객체를 포함하는 일종의 그릇 역할을 합니다.
쉽게 설명하자면 뷰를 배치할 때 사용하는 클래스(기술)이라고 보시면 됩니다.
1. LinearLayout
LinearLayout은 레이아웃 클래스를 이용하여 뷰들을 선형으로 배치합니다.
LinearLayout은 뷰를 가로나 세로방향으로 나열하는 방식으로
orientation 속성값을 vertical / horizontal 로 설정하는 방식에 따라 나뉩니다.
2. ImageView
위에서 drawable 폴더에 저장했던 전구 이미지를 사용하기 위해 src부분에 해당 이미지의 이름을 넣고
kotlin을 사용하는 부분인 activity 클래스에서 이용하기 위해 id라고 하는 일종의 tag를 설정해 줍니다.
3. text
text에서는 gravity라는 부분이 있습니다.
gravity는 일종의 한글에서의 글 정렬으로 center로 설정한다면 글이 가운데로 정렬됩니다.
4. button
XML은 실질적인 기능을 구현하는 곳이 아닙니다. XML에서 버튼을 구현한다는 것은 단지 껍데기를 만들어주는 것입니다.
실질적인 부분은 위에서 말한 바와 같이 activity class에서 구현해주면 됩니다.
STEP 3. kotlin을 사용하여 실질적인 기능 구현하기

com.example.doro_iot 부분을 우클릭한 후 new -> kotlin class/File을 클릭하고
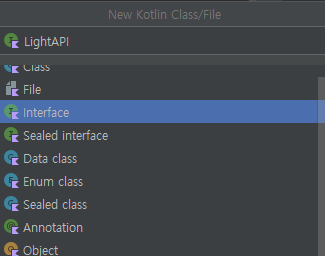
interface를 선택하고 LightAPI라고 입력한 후 엔터키를 눌러 파일을 생성합니다.
package com.example.doro_iot

import retrofit2.Response
import retrofit2.http.Body

import retrofit2.http.POST

interface LightAPI {
    @POST("On")
    suspend fun control(@Body smartFarmModel: LightModel): Response<Void>

    @POST("Off")
    suspend fun controlOff(@Body smartFarmModel: LightModel): Response<Void>

    @POST("Switch")
    suspend fun control(@Body smartFarmModel: LightModel): Response<Void>

}
해당 파일에는 위의 코드를 입력합니다.
이번에는 위와 같은 방식으로 LightObject파일을 생성합니다. (object를 선택하면 됩니다.)
package com.example.doro_iot

import com.example.doro_iot.LightObject.BASE_URL
import com.google.gson.GsonBuilder
import retrofit2.Retrofit
import retrofit2.converter.gson.GsonConverterFactory

object LightObject {
    private const val BASE_URL = "arduio 보드의 ip주소"

    private val getRetrofitLight by lazy {
        Retrofit.Builder()
            .baseUrl(LightObject.BASE_URL)
            .addConverterFactory(GsonConverterFactory.create(GsonBuilder().setLenient().create()))
            .build()
    }

    val getRetrofitLightService : LightAPI by lazy { getRetrofitLight.create(LightAPI::class.java) }


    fun getInstance(): LightAPI? {
        return getRetrofitLightService
    }
}
이번에는 위와 같은 방식으로 LightModelt파일을 생성합니다. (Data class를 선택하면 됩니다.)
package com.example.doro_iot

import com.google.gson.annotations.SerializedName

data class LightModel(
    @SerializedName("switch")
    val ledControll: String,
)
위의 코드를 입력하면 됩니다.
이번에는 기존에 생성되어 있던 MainActivity에 작성합니다.
package com.example.doro_iot

import androidx.appcompat.app.AppCompatActivity
import android.os.Bundle
import android.os.Handler
import android.os.Looper
import android.util.Log
import com.example.doro_iot.databinding.ActivityMainBinding
import kotlinx.coroutines.Dispatchers
import kotlinx.coroutines.GlobalScope
import kotlinx.coroutines.launch
import java.io.IOException

class MainActivity : AppCompatActivity() {

    lateinit var binding: ActivityMainBinding

    override fun onCreate(savedInstanceState: Bundle?) {
        super.onCreate(savedInstanceState)
        val binding = ActivityMainBinding.inflate(layoutInflater)
        setContentView(binding.root)

        binding.ledOn.setOnClickListener {
            var text = "/On"
            sendText(text)
            text = "/Switch"
            Handler(Looper.getMainLooper()).postDelayed({
                sendText(text)
            }, 200)


        }

        binding.ledOff.setOnClickListener {
            var text = "/Off"
            sendText(text)
            text = "/Switch"
            Handler(Looper.getMainLooper()).postDelayed({
                sendText(text)
            }, 200)
        }
    }

    private fun sendText(text: String) {
        val model = LightModel(text)
        GlobalScope.launch(Dispatchers.IO) {
            try {
                if(text == "/On"){
                    val response = LightObject.getRetrofitLightService.controlOn(LightModel(text.toString()))
                    if (response.isSuccessful){
                        Log.d("success","data sent successfully")
                    } else {
                        Log.e("error","failed to send data")
                    }
                } else if(text == "/Off"){
                    val response = LightObject.getRetrofitLightService.controlOff(LightModel(text.toString()))
                    if (response.isSuccessful){
                        Log.d("success","data sent successfully")
                    } else {
                        Log.e("error","failed to send data")
                    }
                } else if(text == "/Switch"){
                    val response = LightObject.getRetrofitLightService.control(LightModel(text.toString()))
                    if (response.isSuccessful){
                        Log.d("success","data sent successfully")
                    } else {
                        Log.e("error","failed to send data")
                    }
                }
            } catch (e: IOException){
                Log.e("error", "IOException: ${e.message}")
            }
        }
    }
}
위의 코드를 입력하면 됩니다.
이어서 아두이노 포트인식 에러 해결방법과 아두이노편으로 찾아오겠습니다.
'Arduino' 카테고리의 다른 글
| 비전공자를 위한 Arduino를 이용하여 android 폰으로 Iot 전등 제어하기2(Arduino편) (1) | 2023.09.18 |
|---|---|
| 오류범벅(ESP8266, ESP-01, Arduino UNO) (0) | 2023.05.25 |
| 안드로이드로 아두이와 서버통신 제어하기(WIFI D1 R1, ESP8266, 모터제어, JSON) (0) | 2023.05.09 |
| 두근두근 납땜하기 (0) | 2023.04.29 |
| 안드로이드 앱을 통해 아두이노 led 제어하기 (0) | 2023.04.15 |


